Monday, April 21, 2014

Kitchen Updates Continue

January 2014
 
While we were waiting on the counter sealer to harden I had a few days off work for New Years.  I decided it was perfectly logical to repaint the kitchen.  Back in 2010, when we bought the house, the kitchen was the first room we started working on.  Together Josh and I chose to paint the space a bright green, Benjamin Moore Eccentric Lime to be exact.  Soon friends started affectionately calling it Shrek Green (maybe not affectionately behind our backs).  It was a little unorthodox and loud, but at the time it felt so nice to banish the sooty mustard walls with something bright and happy.


Over the last four years we have slowly painted other rooms in the house.  These rooms all were painted serene nature inspired colors: dark mossy greens, sunny yellows, rich earthy browns, and cool deep blues.  With each new paint color, the kitchen became more and more out of character with our home.  While we loved our Shrek green, it wasn't exactly fitting in the palette.  The clincher came when we got all new kitchen gear for our wedding.  For the most part we chose neutral white and black items, however most of serving pieces and smaller appliances were a bright cheery red. Since all of our upper cabinets are doorless, these new items started giving the room a bit of a year around christmas theme.

 
At first, I thought about painting the whole room white to match the trim and cabinets, but we decided a little definition would help call out some of the nice features of the room. We decided a nice neutral light gray would be perfect.  Since we already loved our bathroom color BM Stonington Gray, it made sense to get something similar.  We decided to go one lighter on the same paint strip which brought us to Wickham Gray. Having learned from our past mistakes we got the paint in our favorite Acrinamel Satin paint from Miller.  The enamel base will allow us to wipe the walls down much easier and will help us avoid greasy build up.  The existing green in our kitchen was Acro Pure satin from Miller (which is VOC free and good quality, but it took multiple coats and tended to smudge if you wiped it, long term we have been told it can go chalky as well).  


So, over a few days I washed the walls, taped, and then painted the kitchen.  I split the room in two; doing the nook first and then the fridge side of the kitchen a few days later.  This is currently my new favorite way of painting a room.  It allows me to not empty the entire space and gives me the opportunity to get two coats done in one day.  This did mean I had to move everything off our pantry shelf AGAIN, which I really could have done without, but still, it was relatively easy.
 
 
The paint definitely reads more blue than gray in the space, I wish it was a little more gray.  There is something about the lighting in our house we cannot seem to get right, it feels like everything takes on a blue tone. However, it achieved the look I was overall going for.  The room is now bright without being loud, feels fresh and clean, and allows a few of our more colorful objects to shine.
 
 
By the time I was done painting the counters were ready to be used, Josh added quarter round edging and installed back the window trim.  Together we cleaned the kitchen and moved everything back. I think this can count as a mini-remodel and hopefully the last kitchen post I will do for a while.


Monday, April 14, 2014

Merry Christmas Counters to Us

December 2013

After the haze of the Thanksgiving cleared we went back to everyday cooking.  As December slipped away and we got closer to Christmas we spent more and more time in the nook. We soon learned the space had some problems. The worst offender was the existing wood counter.  First, it was too small, at only 18" deep it barely held anything, worse it left an awkward 6" gap between the range and the counter which was the perfect spot to drop just about everything on it's way to the pan. 
 

Second, the counter was disgusting.  I have this picture and I hesitate putting it on the internet for fear no one would ever eat at our house again.  The counter had split open in several places, the varnish had worn/chipped off in many other areas and the entire thing was just crying for something, anything. 


Not wanting to invest too much money or time Josh and I brainstormed solutions.  Completely remove the counter and buy a butcher block table or a credenza?  Have a professional build cabinets back there? Just replace the countertop?

Given some research and the thought in the back of our minds we might one day remodel the kitchen  we decided the cheapest solution would win out.  Our decision was to buy some IKEA butcher block counters.  These come highly lauded on the internet as cheap and good quality.  The problem?  After waiting a month our local IKEA never got the item in stock and had no estimated arrival date.  Frustrated, I priced other locations, but their butcher block was 4 times the cost.  Biting the bullet, I decided to buy it online and pay the crazy shipping price to have it sent.  In a last minute moment of insanity or clarity, I ordered two...  The shipping would be the same and if it was a good as everyone said we could always use it for something else, right?  A week later I was the owner and possessor of two countertops. 
 
 
We quickly removed the old counter and immediately banished it from the house. It became clear that the original supports were janky.  After a long conversation which included: how to make it right? did we want it right? How big is this project going to be? We decided to work with it rather then remove it and potentially add another weekend of work to our progress. I also took our moment of conversing to talk Josh into using the second countertop to add a shelf under the counter to allow us to have some additional storage.  Bonus!

 
So, we went to Lowes, picked up some 2x4's, some long lag screws, and some small quarter round and went about adding additional support to the upper counter (this new counter was much bigger and much heavier), and another set of supports for the lower shelf. After Josh cut and screwed them to wall I followed behind and painted them white in the hope this would help them fade away into the panelling.  If we had done this right, we would have removed the old, install a better ledger board and proper brackets, but honestly... this works and took one day.
 

Next, Josh cut the lower shelf and notched the ends to fit around the existing struts that came down. Now comes the part where we share the moment things stopped going our way. The counter weighed roughly 80 pounds and given the dimensions of our space and Josh's precise cuts you couldn't tip it into place.  You had to walk it directly in (without scratching the walls, without hitting our brand new range) and drop it down onto the struts.  I just about killed him when we put it in place only to decide the shelf should be narrower.  So it came out, went outside, was ripped down and had to be returned to the space.  Have I ever said how nice he is? The good news is we got better at the technique and the upper counter went in a lot easier.
 
 
We had decided that it would be best to stain and seal the lower shelf in place rather than somewhere else.  First, because moving it out and in again might be the end of us, and second because we were afraid of damaging the area.  This became my project so I stained the lower shelf  (both top and bottom, because I am perfectionist) and then stained the upper counter  in the basement.  This had me laying on the floor with stain dripping on me directly next to our radiator for 15 minutes, twice.  Christmas time in the Cabot house!  Cursing aside, it looked great.  We used two coats of Cabot Gunstock Stain (same as the floors) and then installed the upper counter and used 3 coats of Waterlox marine sealer on both (I only sealed the tops and edge). 
 
 
Each coat of sealer took 24 hours to dry so it was a week long process to apply the three coats. We then had another 7 days of hardening before we were allowed to put anything on it. So these pictures show it during the 7 day dry period.
 
Our last step would be to reinstall the window trim, install quarter round around the edges, caulk, silicone and do some touch up paint.  The process to date had taken about 10 days but we couldn't wait to start using our new HUGE counter and added storage. It was our little Christmas present to ourselves.


Monday, April 7, 2014

Installing a New Stove: Empty Entire Kitchen...

November 2013
 
Our stove was delivered on a Thursday, my parents were arriving for Thanksgiving break on Tuesday and I had an entire Thanksgiving meal that needed to be prepared and cooked.  The question quickly became: would it be on the old stove or the new one?
 
 
As soon as we ordered the range we knew we would have to install a gas line in the kitchen.  For some unknown reason our old stove was electric even though all the other appliances/systems in the house ran on gas (boiler, water heater, dryer).  Since the house already had gas, the install only required a plumber to install a new gas line to the kitchen from the basement. Josh called our local plumbing company and explained what we needed to get done and asked if it was possible to get it done in the next week.  Turns out they had an opening on Monday morning and we grabbed it. Possibility for Thanksgiving on the new stove- high.
 
But, it wasn't quite that easy.... we have always hated the layout of our kitchen.  The combination of having the fridge and the stove next to each other with no counter top made cooking very difficult and tended to create a pinch point in the main area. The good news was our our new stove only need a 120v outlet to run the starter so the 220v outlet for the old stove could be removed and we were no longer tethered to it's existing location. The logical choice was to utilize the underused area we would call the nook. 
 
 
Originally, this was a built-in seating area with benches and a table (long gone by the time we bought the house).  Since then we have used a wire shelf to make the space into an ad hoc pantry space.  In a kitchen that is 12' x 7' the relatively little used 5' x 5' storage space was a huge waste.   We decided to swap the stove and the wire shelf, and then after more thought the shelf with the fridge.  This moved the fridge closer to the dining room and the middle of the room. Suddenly we created a bigger work triangle and gained counter space adjacent to the stove for prep. Win.
 
 
To start, we had to remove the wire rack from the nook.  So late on Sunday night I started removing all the food, pots and pans.  The default for all the items was our dining room which made me realize how much stuff we truly had back there.  Let's call it was a good chance to thow away, organize and clean everything.

Granted, we could have removed the existing stove, moved our fridge over and put the rack immediately into the new space. However, there was no way I was removing the existing working stove until I was 100% sure this new stove was working. Don't I sound like a jaded homeowner?  (Really it's just the sad truth after years of expecting a brand new nice thing to work and then being in a lurch when it didn't).
 
On Monday morning, our plumber arrived.  The entire job went well, the gas dryer sits directly below and so we only had to stub up through the floor from an existing T on the line.  In two hours he had plumbed the line, restarted all our pilot lights and tried the stove to make sure it worked right.  We were thrilled and that night we quickly broke in the range. I had exactly 3 days to learn all the tricks of gas cooking before I put it through the paces of an entire Thanksgiving dinner.


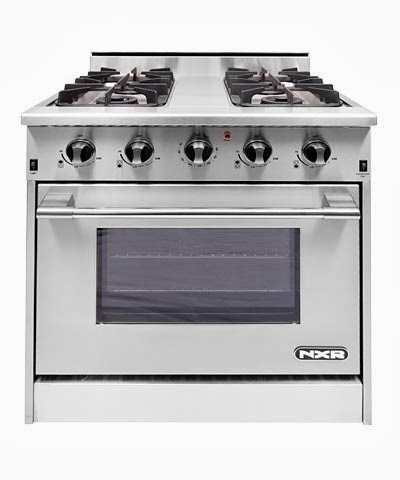
The new stove was an unrelegated success! Together Josh and I made our very first Thanksgiving dinner and every step of the way NXR was there. Here is some celebratory pictures of our bird, and spread!


Monday, March 31, 2014

Sexy.... Gas Range Time

November 2013
 
We did it, we bought a new range!

Background: in 2010, when we moved in we replaced all the appliances in the house except the range. It was newer, from 2006, and it seemed unnecessary to replace something that was four years old. However, as soon as we started using it we knew we wanted to change it out to a gas range.  Josh and I both enjoy cooking. Actually, the better description is Josh likes to cook and I like to drink wine and occasionally bake pies.  
A little scary reminder of it when we bought the house

Over time we began to hate our existing range and not just because it was electric.  True hate.  Reasons:
1. It took forever for things to heat up on it
2. It only had one heating element inside the stove (on the top) which meant you could never evenly bake anything
3. It had one of those smooth cook tops which had several dark burn marks from the day we got it and if you didn't clean it everyday you added more baked on stains 
4. The handle on the door like to detach at the worst times (like when you had a large burning hot meat dish in your hand). We did eventually fix this by using epoxy to glue it back on, but still
5. It was the only white appliance in the whole house, sitting right next to our stainless fridge.
6. It was the pits

Apparently I hated it so much I only accidentally took a picture of it from the mudroom
So why the wait?  The price tag. We got our dishwasher and fridge super cheap, as in the combined cost was less then most people spend on a standard fridge.  But ranges seem to never go on super sale, especially the stainless steel gas ones.  Also, all the fancy name stoves not only cost as much as a car, but had horrible reviews for quality and warranty issues.  After waiting and watching,  I got an issue of Consumer Reports that listed their top gas ranges.  I was excited to see a super affordable range made the top of the list.  It had the professional look we were going for and seemed to be the cost of some of the cheaper builder grade ranges. I did some research online and discovered that Cosco currently had the item on sale and would ship it for free.  It was too much to deny.
I called my parents and asked about an early Christmas present, as well as a Josh birthday present, as well as the next two holiday presents.  Seriously, I wanted this stove!  They agreed and gave us the go ahead (even better they were Cosco members, unlike us).  So, I ordered the stove and then heard back that day: it was coming the next week.  The week before Thanksgiving, when I was planning on cooking a huge meal. Holy cow.
  
I'll save you the long story but the way Cosco delivers items is 'curbside,' literally, on your curb from their truck  I was aware of this but when I saw the shipping weight: 500lbs I got worried.  Once the item was in the house I knew we could put it on our foam moving men pads and move it anywhere.  However we had 4 large concrete steps between our curb and our kitchen.  I made a plan, I would borrow a large dolly from work and take off the afternoon, then I would bribe the delivery guys to somehow get it into my house. Armed with my best smile and some twenty dollar bills I readied myself.  It kinda of worked.  The driver and his helper arrived, and were so nice.  The problem: he was in his 60's and his helper was shorter and thinner then I was.  Together the three of us manhandled 500lbs on to the dolly, rolled it to the stairs and then tried to pull it up the stairs.  We failed about half way up.

 
My neighbor, who happened to be washing his car across the way ran over and with his help we pulled it the last two steps. It was crazy scary!  I gave the driver and his helper a tip (which they tried to refuse?!?) and bought my neighbor some beer and then proceeded to dance around the huge paletted stove box in my living room!  I adore you gas range and you are shiny and I will love you forever!
 

Tuesday, March 25, 2014

1970's Called.... It Wants Your Paneling

November 2013

After the wedding, Josh and I took a much needed month vacation from any house or life projects.  It was glorious!  Then it happened, I started to feel the itch and needed to find a quick and easy house project that wouldn't cost me anything.  Just so you can understand how much I need house projects I started this on November 9, 40 days after we returned from our honeymoon. 40 days and 40 nights without house project, the longest I had gone in over 4 years. Impressive.
 
 
Ever since painting the windows in the guest room I had the urge to paint the dark wood panelling in the space.  Originally, I embraced it in all it's 1970's glory, but the fact was it was in pretty beat up shape.  There were several areas that needed patching and repair. So it started on a Saturday when I spent a few hours moving everything to one side of the room and patching and caulking a few holes, gouges, and cracks.  A quick sand and wipe down and I was ready to rumble. 
 
 
We only have panelling on two walls, so this was going to be a quick project. I decided to put the primer on Saturday night right after dinner so it had a good 10 hours to dry.  Very quickly I discovered our primer had gone off (apparently 3 years is all you get with Kilz). It was chunky and smelled horrible. After spending 30 minutes trying to salvage it by mixing and adding bleach I had to call it.  I managed to find another primer deep in the depths of our basement hoard.  By the time I restarted it was 8pm and suddenly my easy project had me painting late into the night in a grumpy mood. Sigh.
 
This photo was taken with my cell phone- not classy
Sunday ,I woke up early so I could get two coats of paint on the panels.  The primer had essentially absorbed into the wall so I knew multiple coats may be in my future.  I decided to paint the entire wall with a brush.  I figured I could get more paint on, get into the crevices of the panelling and wood grain and hopefully give the panelling a more wood work look.  I used a three inch brush and moved through the room painting our bone white acrinamel.  It definitely was slow in comparison to a roller, but it wasn't horrible.  It took me about 90 minutes to finish the first coat.  Later, around dinner time, I went back and did a second coat.  Luckily, that seemed to be all the room needed. 


I cleaned the floors and dusted the furniture and then put everything back into place on Monday.  This is now the brightest room in our house.  It gets both South and West light so with the new white panelling it practically glowed afterward.  A small mini update and the room was ready for my parents to visit for Thanksgiving.
 

Tuesday, March 18, 2014

So We Got Married... (not a house post)

September 2013
 
Not much of a surprise to those that know us.  On September 21, 2013 Josh and I got married in Hood River Oregon.  Much of the work on the house, spotty blog posting, and lack of photos stems from our work, exhaustion, and excitement for the big day. In many ways, planning our wedding was similar to working on the house.  Josh and I had by no means a diy wedding.  However, I would say that we tried to make our wedding very homemade.   We made sure that the details reflected us and our interests, values, and style. This meant that we worked as our own wedding planners, we selected all our own vendors, when possible we made made choices that were in season, organic or local. Together we created our theme and crafted many of the details of the day.
 
 
We decided to make our own Save the Dates.  We made our own wedding favors.   We outsourced our real wood engraved invites. We love stationary and felt this was the best way to give every guest a keepsake even if they didn't come to the wedding. Our homemade touch was to tie the invites and additional pieces together with some bakers twine and a small piece of Cedar from our backyard.  We handstamped the rsvp envelopes and then I choose to hand calligraphy all the invites by hand.


For the day of, we picked Mt Hood Organic Farms for its scenery and all the different architectural buildings that allowed us to have both indoor and outdoor aspects. We knew we wanted to get married outside with a view of all the beauty Oregon had to offer. 


For flowers we used my existing large collection of vintage blue mason jars and used as much local in season flowers and greens as possible.

 
Our table assignments stemmed from the idea that each table would be a place we had visited together. We found vintage travel posters for each location and placed them on the table. Guests found their names on a luggage tags that directed them to their specific table.
 

We choose to hire a second photographer to run our photobooth.  Rather than have props we choose to rent an old Victorian couch that moved throughout the event.


For our outfits we tried to go custom. I knew I didn't want a strapless dress from day one. Then meant I had to make my own semi-custom dress by ordering additional lace that allowed my seamstress to design the sleeves and a key hole back I wanted.  Josh got a custom made three piece suit from a local company. We decided to go with a neutral gray color and then added buffalo nickels for buttons to pick up on Josh's Wyoming upbringing. Gus was our ring bearer and had his own bowtie and a custom made pillow.


It was an amazing weekend of events which included a night of pints and pies on Friday, the wedding on Saturday and a house party on Sunday.  The house party may have been the death of me.  Small projects had to be completed, windows were cleaned, landscaping was spruced and the house was uber cleaned. See I still made this post about the house!


Thursday, February 20, 2014

The Saddest Little Corner in the World

September 2013

Welcome back to our saddest little corner of the world, I am looking at you Southwest backyard corner.   We had a party in three weeks and nothing was more pressing then the cinder block monster that was now o so visible with the pine tree removal.  I honestly just couldn't stomach dealing with it. Luckily, I had done some free-lance design work on the side for some contractor friends and they still owed me. I asked if we could do a work trade instead of payment. They agreed to skim coat the cinder block wall and paint it for free if I provided the paint and mortar mix. DEAL


So I took a trip to Lowes bought 15 bags of mortar mix and a gallon of paint.  In one day they roughly applied a skim coat of mortar to the wall.  The wall was in bad shape, it was missing mortar between the cinder blocks, someone had nailed several large metal spikes into the wall for hanging baskets and it was generally pretty gross. Since we were not actually using stucco all we did was trawl on a layer working it into the mortar joints.  The final product was that we were left with a large gray wall that looked slightly better then the masonry wall of sadness.

We knew we didn't want to paint the wall any color to grab attention, that ruled out our blue house color, white paint, or the dark red of our porch.  We decided to pick a cedar brown color that would hopefully blend in if we ever replaced the fences with wood. The color was a little more red then were are expecting and is maybe a little more Tuscan then woodsy, but it looked 800 times better then the unfinished cinder block wall and we were only to happy to live with it.


Unfortunately, no actual pictures were taken in September, these were from December- blog fail
After the wall was painted we had to address the landscaping or more accurately the lack there of.  The first step was to get rid of all the random stuff we had stacked back there.  Trash cans were filled with broken concrete, plastic pots.  Wood branches, logs, leaves, and pine needles were made into fire wood or placed in the lawn debris bin.  For some reason, we unearthed 9 plastic soil bags the previous owner had laid down back there as well as a plastic dinosaur (bonus).  We also found several old rotting stumps and a random assortment of rocks.  After picking out all the rocks and doing a quick pick axe to the stumps we broke out the rototiller to level and freshen up the dirt.  We now were left with a clean but barren landscape.

We decided to keep the single rhodie that had been hiding back there.  Feeling tight on cash and already out the $400 for the tree removal we struggled with what to fill the area with that was cost effective.  We went to the nursery and bought 3 trees. We went for the biggest ones we could get in our price range.  First up was one additional Donard Cypress for along the back fence and then two Sekkan Sugi Cedars (aka. Golden Japanese Cedars).  We picked them for several reasons, first I liked their fuzzy nature, second they seemed to go with our lime green cypress trees and third they grow to only 20-25' tall and only get about 5-10' wide. After our large pine we had no interest in creating a huge issue down the line with a too large tree that would block out the sun or take over the yard.


We filled out the area with some more limelight hydrangeas (because I can't help myself) and a weeping hemlock.  It stills feels sparse, but everything grows and hopefully in a few years it won't seem so bare. I can't wait for spring when everything takes off!


Below is a view from inside the porch in October, you can see the additional Donard Cypress and one of the Japanese Cedars in the corner.  Unfortunately, you can also see the expanse of our horrible pinstriped cyclone fence. Grow trees... Grow!