Wednesday, May 30, 2012

A Whole New Room

October 2011

Up until now, we have been pretty elusive about our back bedroom.  This room is located on the ground floor in the southwest corner of our house.  It made a brief appearance in one of our first posts as the hoarder room aka. Room of Requirement.  Since then, we have had a roommate in the space. Since this was her personal space I didn't want to make it internet fodder so we have left the space out.  She was a great help and started it off with a new coat of paint and took down the peeling wallpaper that covered the wood paneling.  It made a huge improvement taking down the wallpaper and exposing the vintage 1970's 'wood' paneling.  Our roommate lived with us for a little over a year and when she moved out we were struck by the new addition of a room into our lives. 


In the past, we had owned effectively a two bedroom house, we suddenly had a third bedroom.  We had a guest room!  Or I guess you can say we almost had a guest room. We didn't exactly have any furniture or real plans for the room.  Josh and I really liked the color our roommate had chosen.  It is roughly the color of butternut squash and it works well with the amazing west and south light. What we weren't sure we liked was the dark paneling on two walls.  However, since it is just our guest room we have decided to keep it for now.  Back during our exterior remodel we changed out all the windows in the room (which we have yet to paint) but they were a definite improvement over the broken-glass-held-together-with-tape arrangement that was there. 


Like most guest rooms, it has slowly been filled with various things that didn't fit in other rooms. In August, for my birthday, my parents got us a new bed (more on this later).  So, our old bed frame came downstairs.  I also had an old ikea bookcase that became a nightstand. Slowly, we purchased a new mattress, pillows, comforters and starting making it into a usable room. We knew when we did the big master bedroom remodel that some more furniture might come down to join it.  The good news was we were able to entertain our very first overnighters (Kristen and Kyle yay!) in their own room on October 17 (big time grown-up moment).

Thursday, May 24, 2012

Best House Project Ever- Porch Light

September 2011

I am sure you have a few questions already... what happened to August 2011? Why aren't you talking about the mud room...  etc. ?  We took August off from house work, we worked on the garden, went to some concerts, volunteered, celebrated my birthday and planned some September trips. We did manage to take a few hours out of the one of the weekends to install our 'new' outdoor porch light.  I am putting 'new' in quotes because my parents bought this light for us as a house warming gift.  That's right... when we moved in, in May 2010.  It sat in our basement for over a year looking pretty and doing not much else. 

There is multiple excuses of why it did not get installed, the biggest being we knew we were going to remodel the outside and did not want it to get damaged.  The real reason is we put in the basement and then it kinda moved off our to-do list.  But, we had no more excuses, the exterior had been done for two months and the bare light bulb was definitely lowering our curb appeal.


For those of you who are wondering, it is a pottery barn light, my parents got in on sale for memorial day, it is a beautiful moravian star light with speckled clear glass and an oil rub bronze finish.  We pulled it out of the box, shortened the chain, and turned off the breaker. Project light was off and running 16 months in the making.
 
Josh quickly got the old bare bulb socket off the ceiling and we realized the new light base had a much smaller circumference.  For the record, this has happened every time we have installed a new light... what gives?  So, we had to sand the area down and then quickly apply two coats of yellow paint to the area.  Two hours later we came back. The biggest issue we had was that the old wiring in the house is not color coded.  It's hard to know which wire is the positive and which is the negative.   Josh held the fixture and I hooked it up, and I took a shot in the dark.  We ran a test (involving running down to the breaker and flipping the switch), which proved I had guessed wrong.... urgh!  50/50 never works for me.  We uninstalled it and swapped the wires (since this time we have bought an electrical meter to avoid this).
 

The best part was when we flipped the light on... something amazing happened, the barrel vault in our front porch immediately reflected a lattice work of triangles from the star.  It was pretty freaking amazing and a total unexpected win!  I love this light.  This is probably the cheapest and most satisfying house project ever.  It look us about 4 hours (painting included) cost under $100 and transformed our entire porch.  If I had known this I would have installed it ages ago.

Friday, May 18, 2012

The Mudroom Vortex

July 2011

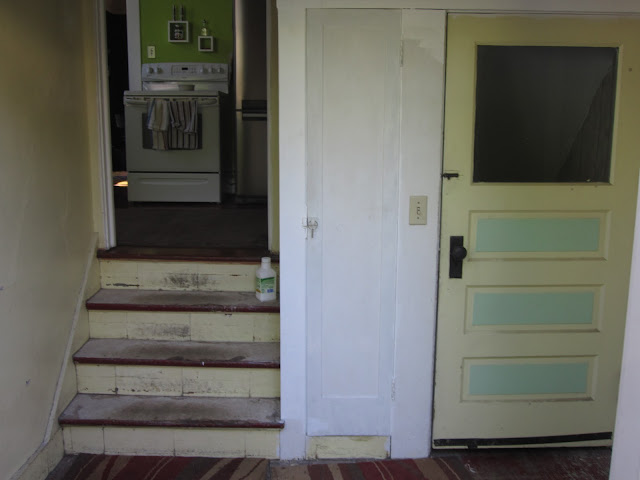
One of things that can often be the most frustrating part of remodeling is how once you complete one project there is another one right there.  When your whole room looks horrible you can overlook at lot of issues, once you fix one thing in the room the other things look even worse!  Insert the mudroom.  To start, this is not a mud room.  This is the staircase landing to the basement that also opens to our backyard.  I wish it was about 3x bigger because it seems like everything ends up here! 

Once we installed the new french doors and new dog door the rest of the room looked even worse!  The plaster was cracked and crumbling,  the trim was half painted, and we pulled up the 70's laminate tiles in the space exposing beat up wood floor and steps. This space is right off our kitchen and when I sit on my spot on the couch I can actually see into it from the living room!  It needed to be addressed. 
 
 
Our first step was to fix the crumbling plaster.  It was pretty beat-up and was covered in chipping lead paint.  Josh and I decided it would probably safer and easier in the long run if we went ahead and covered the room in bead board.  We were already friends with bead board, we had installed it as a back splash about 6 months earlier (see post) and we knew it would work.   I drove out to Mr. Plywood (yes, that is a place... and it is awesome) and bought 4 sheets of pine exterior grade bead board as well as some trim pieces.  I took the day off work and hired our friend Gordon (dishwasher installer extraordinaire) to install the pieces. 

This was another job we thought about doing ourselves however there was a LOT of angles in the room and the sheets would need to be cut perfectly. Perfect isn't quite Josh and I's style... decent is more our speed.  Gordon spent the day installing the sheets and by the end was calling the room the Oregon vortex.  There was not one level surface in the entire space.  The floor slopes down, the stairs go up and down, the room also seems to slant toward the left.  The moral of the story is... it is a lot harder then it looks, especially when the vertical lines of the bead board will happily tell you how unsquare things are.

 
In the end, I couldn't have been happier.  I desperately wanted to get into the space and start painting but we still have to sand the floors, skim coat the ceiling and sand everything.  But the good news was that the lead paint was gone and so were the crumbling walls!  
 

Monday, May 14, 2012

Garden Updates

July 2011

While our remodel was going on Josh and I tried to stay on top of our little garden.  It was hard, the hoses were often missing and our free time was often non-existent.  But, we had spent three weekends making our raised beds and were determined to get some sort of a garden out of it.

 
The good news was this is Oregon and well, life just wants to happen.  After a slow start our garden eventually started to take off.  And then in a few short weeks completely overwhelmed us.  We had tomato plants that were 4' tall.  We were making squash the size of footballs!

At the same time, we also tackled some smaller projects out in the front yard.  When we first moved in there was a large gravel pit next to our driveway.  I am not sure what the thinking was (I believe it was for garbage cans).  Whatever the thought, it was horrible, the pit was so deep you couldn't roll anything and all of our neighborhood cats had decided this worked as a great litter box.  Gross.   Back when we did the trash bin area (see earlier post) we dug all the gravel out and reused it back there.  Then for several months this became a hole we ignored.


In the early summer we tried to create a hard surface area which included buying some expensive and beautiful slate pavers and some sand to lay them on.  It was a disaster.  The pavers were not made to be walked on... or apparently anything on, and quickly broke and chipped.  We hadn't compacted the sand so we also had issues with some areas sinking... and the cats were still at it.  By July, we decided this had to be fixed! Josh went to Lowes and bought some ledge stones about 200 to be exact and some mortar.  We decided to set them in mortar and use the sand as a filler between the stones.  On a sunny afternoon we removed all the slate stones, slopped some mortar in the area and I quickly set stones in the mush.  It was exhausting, but pretty fun.  It was kinda like tetris as we picked through the unevenly sized rocks to try and create a tight fit and an interesting layout.   I will have to post a better picture soon.  This is the only one we have from the time.


The result was pretty sweet.  It was hard, attractive and cat proof.  It also allowed us to roll out garbage up to the street.  We added a few plants to the surrounding bed and called it good. The only issue was now I wanted to do this to our all of our pathways!

Wednesday, May 9, 2012

Loving Our Curb Appeal!

July 2011

As July loomed closer we worked on the finishing touches to our exterior remodel.  Downspots were painted, mulch was added back, and landscaping was spruced up.  The remodel lasted a little under 2 months and we were officially done and broke.  We managed to stay within our budget and accomplish a lot of our goals. However, towards the end it felt like things were going out and not much was coming in. In the end, we were super happy with the results! I would actually be excited to drive down the street and see our house peaking out!


Here is the orginial wish list so you can see how we did:
1. Replace all windows that were not original to the house.  HALF SUCCESS- we replaced 4 of the mismatched windows.  We had to hold off replacing the remaining 4 due to money. 
2. Remove 1970's 10" cedar siding that did not match the style of the house and made it look stumpy.  Replace with more correct cedar shingles or 5" cedar siding.  SUCCESS- We re-used the orginial siding which was under the 1970's siding.  Big cost savings!
3. Repair/replace trim around windows, doors and eaves that had been removed or damaged in the 1970's. SUCCESS-All trim was restored or replaced to match original profiles.  Additional window moulding was added for depth.
4. Replace 8' wide impossible to open or lock sliding glass door to the back porch.  SUCCESS-Replaced with a beautiful wood french door!
5. Remove dangerous understructured and sagging back porch. SUCCESS- Demolished back porch, which was definitely needed.  Although we really miss the covered patio, it was one of our favorite places to eat in the summer.  Another project?
6. Install insulation in walls so our house could get above 60 degrees in the winter. SUCCESS-House was fulled insulated by May, just in time for the good weather.
7. Repair original windows to former glory.  FAIL- we ran out of money.  But it is still a goal to restore the 12 windows. We did replace 3 of the windows due to the level of damage. Which goes back to half-success on number one.
8. Paint whole house pretty colors! SUCCESS-Done and Done, with awesome results!


As soon as the remodel was completed, Josh and I took a much needed vacation to Bethany Beach, DE for 5 days to soak up the sun, see the parents, and enjoy some delicious seafood!


Monday, May 7, 2012

Exterior Paint is Here!

June 2011

The cool thing about painting is that it happens and it happens fast.  Our contractor was spraying the body of the house and so one day we left for work..... and that night we came home and our house was blue! It was super exciting and the difference was immediate!


The following day they came back to start to paint the main trim color the yellow we had selected.  Holy yellow! The problem is something that looks very pale on the small mock up, looked extremely bright and glaring once it goes up.  I came home from work and gulped. I actually kinda regret that we never took a picture because our house looked like a sports jersey (in a somewhat cool way).  As soon as Josh came home I told him we had to go get another color!  We went out to Sherwin Williams at 6:00pm and went to the white section and then picked the yellowest white we could find.  The color was called Tea Light and was about 4 shades lighter then the original color.  The next day our painters got two new gallons and started covering up our little issue.  This color was perfect, it looked like buttercream.  It still read yellow but definitely not in a primary kid school kind of way.  We did keep the porch ceiling the darker yellow as a testament and also because it looked great up there without sunlight.

The delicate nature of painting all the window sashes took some additional time so it took about a week to get the overall color scheme.  To save money I painted the front door and the french doors since doors take a lot of time and detail work.  In the end, we couldn't have been happier with our (almost original) picks.

Our little project was slowly wrapping up!

Thursday, May 3, 2012

Paint Selection Sunday

June 2011

We are finally here, paint colors... the most exciting and overwhelming part of the entire process! At first, I was leaning towards a green house, but in Portland that is a pretty common color.  Josh and I both decided we wanted to paint the house blue.  I recently learned on This Old House that blue is the most popular house color in America besides white.  So, maybe not as original as we thought.... We knew we wanted a darker blue tone, darker colors make your house feel bigger rather than smaller (the opposite of the inside).  Also, since we reused our old siding and only scraped the old paint off we were left with 'alligatoring' which is a term for uneven scaly paint.  The brighter colors would highlight this fact.  The darker ones would help this blend in. Josh and I found we were both on the same page and quickly picked three choices and had a clear favorite.  For those wondering:  Our blue choices were Benjamin Moore: From top to bottom Van Deusen Blue, Lucerne, Buckland Blue. Then the trim decision came into play.


We knew we wanted to use a historic tri-color scheme for the house.  This means you have a body color for the house, a trim color, and a third color for both your doors and the interior sashes of your windows.  I have always wanted to have a maroon door.  I can't explain it, I just have always wanted one.  I love the way a Christmas wreath looks on it, I like the way it stands out to everyone who walks by.  Josh was willing to agree to the maroon, even though several of my red choices made him very nervous.  I was going for cranberry (not quite red).  Reds are hard and it took 4 choices and multiple swatches to pick the right one. 

The hardest part was the main trim color.  White trim is boring and we did not want the house to look like an American flag.  We were divided between going a pale green or a pale yellow color.  We really leaned towards the green for a while, however with the blue, the green and the red it was starting to look like a crayon box!  For a while Josh was looking at a scheme to have green trim and paint the window sashes a light yellow.  It was definitely brighter but I didn't think there was enough contrast between the two colors. We went back and forth with yellows, one was too yellow, one too orange, one seems kinda gold like.  In the end, we created some mock-ups that helped make the decision.  We spent an afternoon sipping drinks and repainting our mock up all the different choices.


By late afternoon we had a choice.  Now it was time to get it on the house!