Tuesday, January 24, 2012

Shameless Self Promotion

I really don't dedicate enough time to this blog, the problem is I am usually doing the work you are reading about, or I am traveling, or working so I can pay for these misadventures.  It's horrible and I feel bad, but I still feel like I can ask all of you for a big favor. 


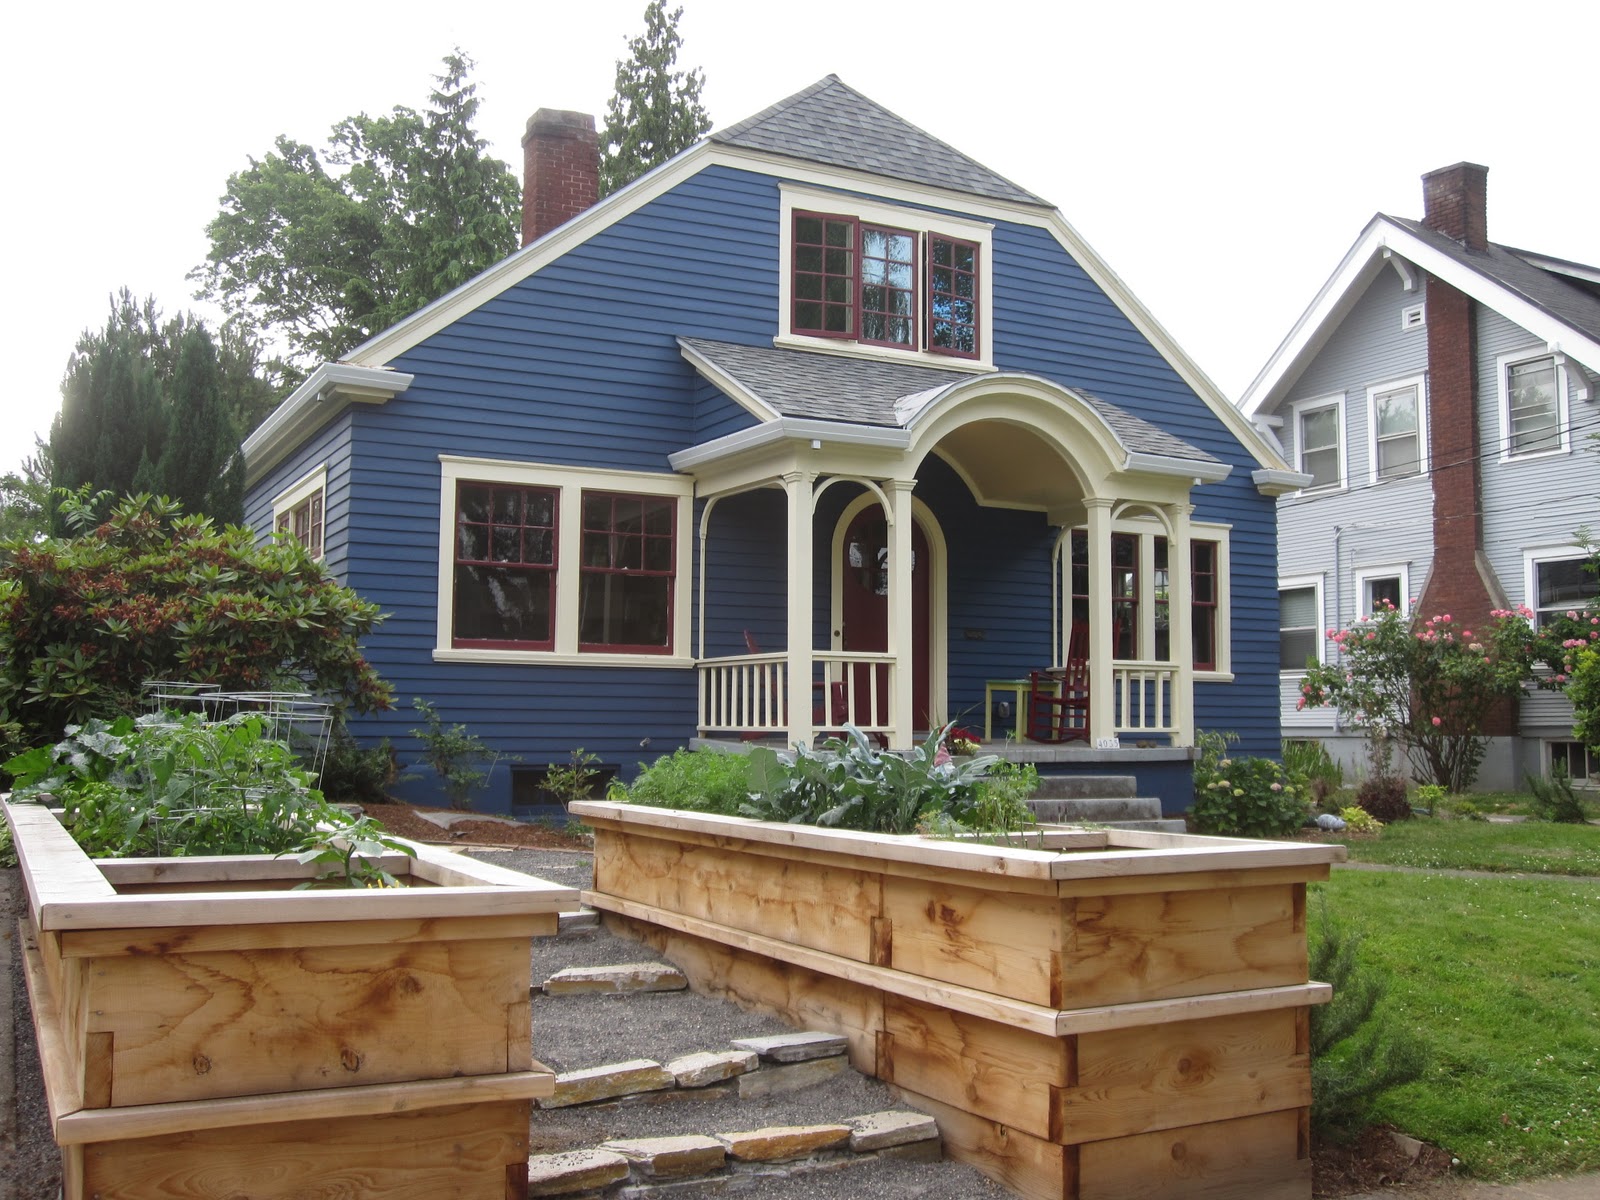
I decided to enter our small house to the This Old House reader curb appeal contest!  There isn't a cash prize or anything but there is bragging rights and a feature in the magazine (swoon).  I won't lie this vain little girl really wants her house in a magazine!

Please go to the link below and slide the bar to 100 and submit.  You can do this once a day... so if you have spare time please vote away!


Now, I have not covered our exterior remodel in the blog world since it was done last summer so you can view this as a teaser also.

Wednesday, January 11, 2012

Built-In Finishing Touches

February 2011

After several weeks of stripping... the built-in.  I moved on to sanding, patching, and painting the lower portion.  This got a healthy three coats of Bone White (see earlier blog for color information).  I also bleached all the drawers down and put new cork liners in the bottom.  Apparently, I am not only a DIY maven but also apparently a clean freak.   After the drawers were lined I installed some brand new knobs I got at Restoration Hardware.  These are amazing, they are real solid oil rub bronze knobs that weigh about a pound each.  I love that they are slightly over sized and remind me of the talking door knob in Alice in Wonderland.  
 

The lower portion went so quickly and easily I felt super successful and excited about the end of the project.  Then I started staining the top.  This took a few tries to get right.  I was trying with a brush at first and it just didn't seem to be going on evenly.  Each time I would sand all the stain off and start again.  Finally I discovered staining with a rag... this was much more successful and after three coats I felt pretty good about my staining jobs.  The second to last step was applying a sealer... I debated between varnish, lacquer, poly or just an oil treatment.  The Internet is a warren of conflicting information, after hundreds of articles and blog entries I gleamed this: varnish is REALLY hard... you should be a professional or at least have a spray gun for it.  Oil would require me 3-4 times a year apply a fresh coat to protect the wood from sun, water, and whatever I left on top.  Apparently lacquer can also go yellow and eventually chip off... urgh.  So I decided good old fashion poly would be my trick. 
 

Of course, I had similar issues with the poly.  I was tentative and putting it on way too light.  The issue with poly is when you are applying it to the surface it looks horrible.  No matter what you do there is brush strokes and small air bubbles.  What I eventually learned was if you apply it thick enough then these spread out and go away as it dries.  After a few different methods I settled on foam brushes. These did not leave brush strokes and after three coats of poly I finally had to admit, I might be done.   I touched up the paint around the top and called it a day.  Needless to say this was a labor of love.  It took we two months and way too long to be proud of.  I think a capable person could do this in about 5 days but in the end I feel like the result was pretty professional and I will admit to running my hands along the glossy top every time I pass it!
 

Saturday, January 7, 2012

Stripping.... A New House First


 January 2011
 
After the holidays.  We were all a little whipped.  Josh and Gus took a well deserved rest.  I on the other hand, seemed to be itching for even more work. sick? I decided to take on our dining room built-in.  Ever since we bought the house I was thinking about stripping it back to bare wood and staining it.  Most of the houses in our neighborhood are older then our house.  These houses are all filled with beautiful unpainted woodwork that I have been very jealous of.

I decided I would start with the top of the built-in and go from there.  The most interesting and frustrating part was that someone had covered the top of the built-in with contact paper.  Contact paper with a fake wood grain.... yay it was a trip.  What was not a trip was the fact that it was REALLY stuck to the cabinet.  It took me a whole day just to peel it off in small centimeter long strips.  Once I got to the painted surface I started putting on the stripper.  I painted it on and covered it with plastic wrap and left it for 24 hours.  When I came back the next day.  I was able to remove two-three layers of the paint.  Unfortunately, there was another two layers of paint under that!   This was going to be slow going!


Once you start a project you can't stop.  I learned from my first pass and thickly covered the wood this time. Around this time, I also realized my built-in had always been painted.  There was no stain or varnish as I got down.  I worried about the inaccurancy of me stripping this bare.  Did houses in the 1920's even have wood showing?  At the same time, I was looking a one solid 8 foot long 1" thick slab of beautiful old growth douglas fir with absolutely no knots or grains. In the end, my love for wood won out.  I decided to compromise. I would strip and seal the top of the buit-in but leave the bottom painted.

Two weeks, and three passes with the stripper and I had removed all the paint from the top of the cabinet.  I would not recommend this project to most people.  I have what is often considered an obsessive attention to small detailed projects.  In fact, I often get overwhelmed with the big picture, so this worked great for me.  Everyday afterwork I stripped a small segment and applied more stripper to sit overnight.  Josh understandably had no interest in taking on this mountain and left me to it.

Friday, December 23, 2011

A 2010 Christmas

December 2010
 
So for those of you coming into this blog a little late.  I figure I should remind people that I have started at the beginning of our adventures.  This means we are only slowly moving closer to present day.  In the wonder that is my procrastination and random happenstance we are now exactly a year out in my projects.  At this time last year, we had completed our small kitchen reno, our outside landscaping, painted our dining and family rooms and done numerous other small and large projects behind the scenes projects to get us to this point.  We decided to take it easy through late November and December as we travelled to see our families and celebrated Josh's brothers wedding in Mexico.
 

I figured if 2011 Christmas is upon us, what better time then now to show our small but in many way momentous first Christmas in our own home.


I look forward to speeding through 2011 projects and getting you caught up and hopefully embrace the new year and blog more often.  Thanks for the reads... please 'follow' me if you can... purely for my own self esteem.  Please have an amazing year my friends for we are indeed truly blessed!
 

Friday, December 9, 2011

Yard Redemption

October 2010
 
After our planting trip, Josh and I stepped it up and pulled some long days to turn up the soil and get the plants in the ground.  We laid it all out and spent an entire day planting, mulching and laying the stones.  By 6:00 pm it was getting dark and we called it a night.  Step one was complete and we had unearthed our house from behind the rhodies.  We felt satisfied to go into the holiday season with a fresh look outside.
 

Also, on a similiar landscaping note we added two 'street trees,' these reside in our planting strip between the sidewalk and the road.  We are the only house on the entire block without street trees and while I enjoy the sunlight, it also makes us look a little bare. 


In the Spring, Josh and I purchased a dwarf Bing Cherry tree, in the Fall, we added a hybrid Cherry tree, which had four separate cherries species grafted onto one trunk.  I am very excited for the day our little saplings are beautiful trees, and of course for all those delicious cherries. My neighbor told me there is a Chinese proverb about trees... "when is the best time to plant a tree?  20 years ago.  What is the next best time to plant a tree? Right now." 

Saturday, November 19, 2011

Yard Destruction

October 2010

So I went a little out of order with my posts because I wanted to get the kitchen saga out all at once.  In October, a month prior to the kitchen remodel we took advantage of some great weather and addressed our yard a little more.  We had made some unsuccessful attempts earlier, but I have not recorded them on the blog because I am supposed to look good on this thing.  So failures are being glossed over. 
 

My biggest issue in the front yard was the five HUGE rhodies that were overtaking the house.  We could have cut them way back, suffer with a year or two of weird filling in, or we could remove them.  These are absolutely beautiful rhodies, they were just too big for where they were, I wanted them gone.  We put a 'you dig you get' notice on craigslist and had a few takers, however, no one could have envisioned how hard these were to remove.  We had an older couple work for three hours before giving up without one rhodie out.  It appeared we needed to rethink this.  So after we did some digging of our own, Josh decided that we need some more power, a lot more power.  He borrowed his companies truck and we chained the trunks to the back of the truck.  We were nervous, but decided slow and steady would be our approach.
 

It was AWESOME, we ripped out four of the five rhodies in about 20 minutes, after three hours of digging.  We lost two rhodies, which were placed in our backyard to rot all winter. Until we broke them down into our yard debris bin.  The other two were craigslisted and went in a week.  Our real problem was landscaping in the front, or I guess you could say the lack there of.  It was October and we had to get moving! We went out to Garden World, a huge nursery 30 minutes outside of Portland, and took advantage of the late season to stock up on some goods.  We bought hydrangeas, mums, a Virginia Sweetspire, a crape mrytle and some other smaller ferns.  

We also bought several stepping stones from lowes to create a pathway from the driveway to the front walk.

Monday, November 14, 2011

Making A backSPLASH

November 2010

Now that we had replaced our counters, sink and faucet we had to deal with the missing backsplash.  At first, we thought about putting in subway tile.  We price out the tile and realized this was a bigger investment then we had first thought.  The other issue was the time involved.  Neither Josh nor I have ever tiled before, we knew we were capable, but a little nervous of our finish craft.  Then we thought about the weekends of work to install the tile, grout it, and seal it.  We also realized this would all have to happen while we were using the kitchen, not ideal.   There was also the lingering thought in the back of our heads that one day we really wanted to gut the kitchen and create a more functional space.  Our new goal was to put in a backsplash in the fastest cheapest way without it looking like an afterthought. 

 
We decided we would beadboard the backsplash.  We felt that the beadboard matched the overall style of the house and it was about half the cost.  We went to Lowes and got some 3' x 4" pine beadboard wainscotting.  We laid out all the pieces and primed them at night during the work week, then Josh spent two days installing them, cutting around our various switches and cabinets.  He also installed some trim underneath the countertop to dress up the transition.  It was a whole weekend of work, but it made such a difference. I followed behind with my trusty caulk gun and white acrinamel semi-gloss.  All in all, we felt pretty good about our solution.  It was fairly easy and kept with the style of the house.  We worry a little about the durability of having wood right near our sink but it seems to be fine. Our little kitchen was wrapping up.