Wednesday, August 8, 2012

Plaster and Paint, And Then Paint Again


February 2012

After our built-in's were completed we brought in a contractor to skim coat our bedroom walls.  We did this for two reasons.  The first being the room was drywall with a speckle texture which did not match the rest of the house.  The second was we had done several repairs/modifications to the walls.  There was the access panel, which added some drywall to the South wall, we had framed in the closets and added some new drywall to the North wall, and finally when we insulated the house we went ahead and added some additional insulation into the walls from the interior.  All in all, it made our walls look like a hot mess.  Some had texture, some were smooth, some had large holes. It was rough.


Over the course of two days, the contractor skimmed all of our walls and applied a rough texture that was a close match to our downstairs plaster. During this time, Josh and I worked on paint colors.  We both were on the same page with having a nice serene blue gray color in the bedroom. We thought this would go well with our vibe, and also with the existing headboard fabric and our duvet which was a mixture of blues, grays and tans.  A little before the remodel we went to a awesome bar in Seattle and when I was in the restroom I thought, this is the color I want in my bedroom. Is this weird?  Most likely.  So when I came out of the restroom I asked Josh to come take a look (which got us even weirder looks from the staff).  But they were kind enough to tell us the color was Sherwin Williams Foggy Day. Bonus!  As soon as I got home I went to Sherwin Williams and got a sample, as well as two other colors just to be safe. 


Josh and I thought the best way to work with our low sloped ceiling was to paint it the same color but in a lighter hue.  So I also picked up several shades for the ceiling.  We put our test colors on and actually felt the Foggy Day read a little too-- dare I say Foggy. So we went with a similar shade called Storm Cloud which was a bit more punchy.  We went to Miller Paint, color matched and started painting the ceilings the lighter hue of Storm Cloud and then the walls got painted. This was pretty hard work, ceilings are miserable and it tooks us one VERY long weekend to paint the entire room.  The whole time I painted I had a weird feeling.....


When we were completely done I stepped back and thought, HOLY PURPLE.  With having the color on all four sides of the room it became overwhelming.  The color which appeared to have NO purple in it from the swatch was reading like a mother-of-the-bride lavendar dress gone wrong.  I took a gulp and asked Josh what he thought.  He was silent and then admitted he too was overwhelmed by the color. We went back in forth about being able to live with it.  But in the end, we knew we would always lay in bed hating it.

So, round two:  Foggy Day (I never should have questioned) and a Bone White ceiling to match the rest of the house began.  As much as we complained it was not that bad.  The ceiling took two coats and was horrible, but the walls only took one coat since the Foggy Day was so close to Storm Cloud.   This was the first time Josh and I have ever had to repaint a room.  I am not proud of it, but it happened.  It meant a  wasted weekend and about $100 in paint.  But now the room was perfect and Foggy and we loved it.


Sunday, August 5, 2012

Hello Storage, Have We Met?

February 2012


Soon after we finished framing in the wall, our carpenter Jason arrived to start our built-ins.  The first thing to go in was a bookcase that we designed to go in the small recessed area around the chimney.  We designed it to have a small cabinet on bottom and three movable shelves up above.  The first day it went in was a huge break through! One more hole in this room was finally filed up! Next, Jason installed new baseboards and door trim throughout the room.  Instantly our shanty half constructed room started to look a little more professional. 


Last, he started building in the two closets along the eave wall.  The last step was for him to make the solid wood shaker style doors to match our kitchen cabinets. He then dropped the doors and shelves off for us to start painting, and painting, and painting before he installed them.  We had 6 doors in all, 7 shelves and endless feet of closets and trim to start priming and painting.  We pulled out our trusty Benjamin Moore Bone White Acrinamel and went to work.  We set up the doors and shelves in the basement and I circled the room countless times painting the trim.  Slowly the spaces came together and we started to imagine what life would be like with four walls in the bedroom and enough closet space for all of our clothes. In the meantime, we kept painting.


Tuesday, July 31, 2012

I Used a Framing Gun, It Was Scary

January 2012

The title of this post just about sums up everything I am about to cover.  In December, for Josh's birthday I decided to buy him some useful around the house tools.  Since we had big plans to build a fence in the spring I thought what better gift then a framing gun and a compressor.  For the tool ignorant (pretty much me prior to internet research) these are some big tools. There are many different types of nail guns, again I was not aware.  There are framing guns (the big boys that can hold 2-4" nails), roofing guns (a big nailer that is angled to apply shingles), finish/trim nailers which hold smaller nails for finish work, and finally a brad nailer which is the smallest and made for tacking small trim pieces in place.  Since we were planning on building a fence, I decided to get the framing gun, I soon learned this weighs about 54lbs. Wow.  In addition these nail guns all run on air, so you need to buy a compressor, air tubes and valves.  Quick round up to a long winded paragraph about tools, I bought all of these things and they were large, intense and scary. Josh was of course appropriately impressed with my manly gifts.


Little did we know, we would be using it even sooner then I thought.  For the master bedroom remodel, Josh and I worked on several different schemes for storage in our eaves space.  The eventual decision was to make two closets, that book end each side of the wall, leaving space for our existing wardrobe to sit in between. To help support our built-ins we would need to add some framing which we decided to do ourselves.  This meant we had to remove several studs to create the openings and add some additional studs and a header above each opening. Since space was tight we decided to use the existing 2x4 wall cap and then sister another 2x4 to it for a header.  This gave us a 4x4, we also sistered up the 2x4 wall studs on either side of the opening to make sure we were carrying the weight of the 4' wide closet openings.   To those of you with an architectural background this is not exactly 'to code' however, we felt pretty confident that the wall wasn't going anywhere if we removed 4 studs and added 4 somewhere else.


It was relatively easy work, the hardest part was that Josh had to go up and down the stairs to the backyard to cut all the pieces.  Unfortunately, in old houses the measure twice cut once is often followed by, cut again, and again. This wall was seriously about of plumb.  It was actually leaning into the room by about an in inch and was 1.5" taller near the outer wall.  But back to the nailing.  We fired up the compressor and went to work with safety goggles in place.  It was a huge time saver, our existing 2x4 studs are 80 year old vertical grain doug fir and they have the density of concrete.  Honestly, nailing in them is almost impossible, you pretty much have to predrill to get the nail started. Or, you can have a fancy nail gun that shoots the nail into the wood at approximately 182 mph. Which is intense. I tried a few hits and had to two hand the entire thing.  It was quickly decided I was the better 'hold it in place' assistant then nail gun operator.

After we framed out the wall we added drywall and mudded our screw holes and joints.  We planned on hiring a plaster guy so we didn't worry too much about our finished product.  The main goal was to frame the wall, get the drywall up to allow for the built-ins and some electrical work to happen.  After our foray into home construction we decided to sit back and let the professionals do what they do best. But hey, we looked good doing it!

Friday, July 20, 2012

The First Step to a Remodel- Downsizing

January 2012

As part of project grown up bedroom, we had to vacate.  With all the dust, contractors, and work to be done we realized it could be upwards of a month before we would be able to use our bedroom again.  This wasn't a huge issue because we had the guest room downstairs.  It was still an issue in many ways.  The room is about half the size of our current room and we needed to get most of our things out of the bedroom whether we needed them or not.


First, we brought down my dresser.  This fit pretty well and would actually be staying downstairs so we didn't have to worry about moving it back up the stairs.  Next, we moved Josh's wire rack of clothes down and squeezed it into the corner.  We then emptied our closet, which amazingly all fit in the downstairs closet. Our bed was too big and difficult to take apart so we decided to leave it upstairs, we did take our foam top (we can't really be expected to live without the foam topper?).  By now the room was increasingly full.  Add to that, the requirement of an entire bed for Gus and it was a tight ship.


 How tight?  Gus was forced to sleep inside the closet, a la Harry Potter.  Honestly, I think he kinda like it.  Snug in there, with all our smells, but I still felt bad, especially when he sad eyed me from in there.  I was expecting to hate it down there.  The small room, my stuff in chaos.  Instead I kinda like it.  The room has great light, was definitely quieter (it is at the back of the house, verses our room in the front), and was only steps from our bathroom.   I could get ready in the morning in half the time.  No trips up and down the stairs for changing, forgotten items, dog walks.  It was pretty nice, similar to a dorm room.  We settled into our snug abode for the long hall and kicked off project with a new trick for us: framing and drywall.


Things to note in these pictures.  The lack of curtains on the West wall(again!).  The shady tacked on curtain on the South wall so we didn't look directly into the neighbor's kitchen.  The large prevalence of Games of Thrones books in the room.  Three books in two months (it was bad).  The fact that I took these pictures at 6:30pm in January and it is that dark in Portland.

Wednesday, July 18, 2012

Project: Grown Up Bedroom

January 2012

Probably the most incomplete room in our house was the master bedroom.  When we first bought the house the sheer size of the bedroom wow'ed us. It's about 17' long and about 14' wide, in modern bedroom standards this is probably a guest room, but for those of you who are old house owners you will know this is a huge bedroom.  That was about all it had going for it.

Issues:

1.  There was no drywall on the entire North side of the room.  The studs were there, doing their job holding up the house, but not protecting us from our creepy eaves space.  
2.  There was no trim in this room.  None.  No baseboards, no door trim, nada.  The wood floors stopped short of the walls and there was a nice empty crevice to collect dog hair and anything else that was swept to the side.
3.  The newer vinyl windows did not open properly and were not trimmed to match the house.  (We actually fixed this when we remodeled the outside, we installed a new working and style matching windows as well as new trim)


4. On the South side we had a weird slider door entrance to the shag den.  See earlier post.  (This was decontaminated and closed up) 
5.  For some odd reason there was a large hole in the wall that showed the chimney stack.  I am not sure what this was for, maybe there was a leak?  Maybe they thought about exposing it? Either way it was ugly and dirty and served no purpose
6. There was one standard 4' closet for all of our clothes.
7. The existing ceiling fan was hideous and brass (we replaced this about a month prior, see earlier post)
8. There were two can lights??? (totally not in keeping with the house, but necessary for lighting purposes) that had no trim on them
9.  The walls were drywall not plaster and did not match the overall look of the rest of the house.


I really should stop now because you're getting the point.  It was bad, real bad.  We lived with this for 18 months.  It was starting to be not cool. The biggest hold up had actually been that we didn't exactly know what to do with the space. We knew we needed more closet space, we also knew we had a lot of space behind the stud wall, and in the creepy chimney recess to add some storage.  Josh and I are by no means carpenters.  If you have ever tried finish carpentry you will know what we mean, it is harder than it looks, and requires a good deal of precise cutting.  We didn't feel confident building in the storage and considering the unlevel, unusual sizes of our house we could not utilize off the shelf items.

The kick start finally came when we were walking Gus.  Each night Josh would run into this women with a large yellow lab mix.  Gus and Baxter liked to wrestle and play and so they often stopped to let the dogs duke it out.  Turns out after talking to her, her husband is a carpenter.  They live three blocks away and his workshop was in the neighborhood.  It was the moment we had been waiting for.  We asked him to come look at the areas before Christmas and give us an idea on pricing.  We drew some quick sketches of two closets in the eaves and a bookcase for the the chimney eaves.  We also asked him to install trim in the room to match our exisiting trim throughout the house. His prices were perfect, right in line with what we thought and his work was amazing!


I was super excited to have a professional handmake things for our house.  It always amazes me to look at our house and think about the hours that went into making the panelled solid wood doors, the dining room built-in, the handmade kitchen cabinets. These weren't 'upgrades,'  they came standard on every house, because that was how you made them. I felt like this was the best way to go.  Pay someone in our own community to make beautiful things in the way they used to be made.  Respect your house, respect craftsman.  Buy local.  Buy Real.  It felt good. 

Wednesday, July 11, 2012

The Dark Place.

January 2012

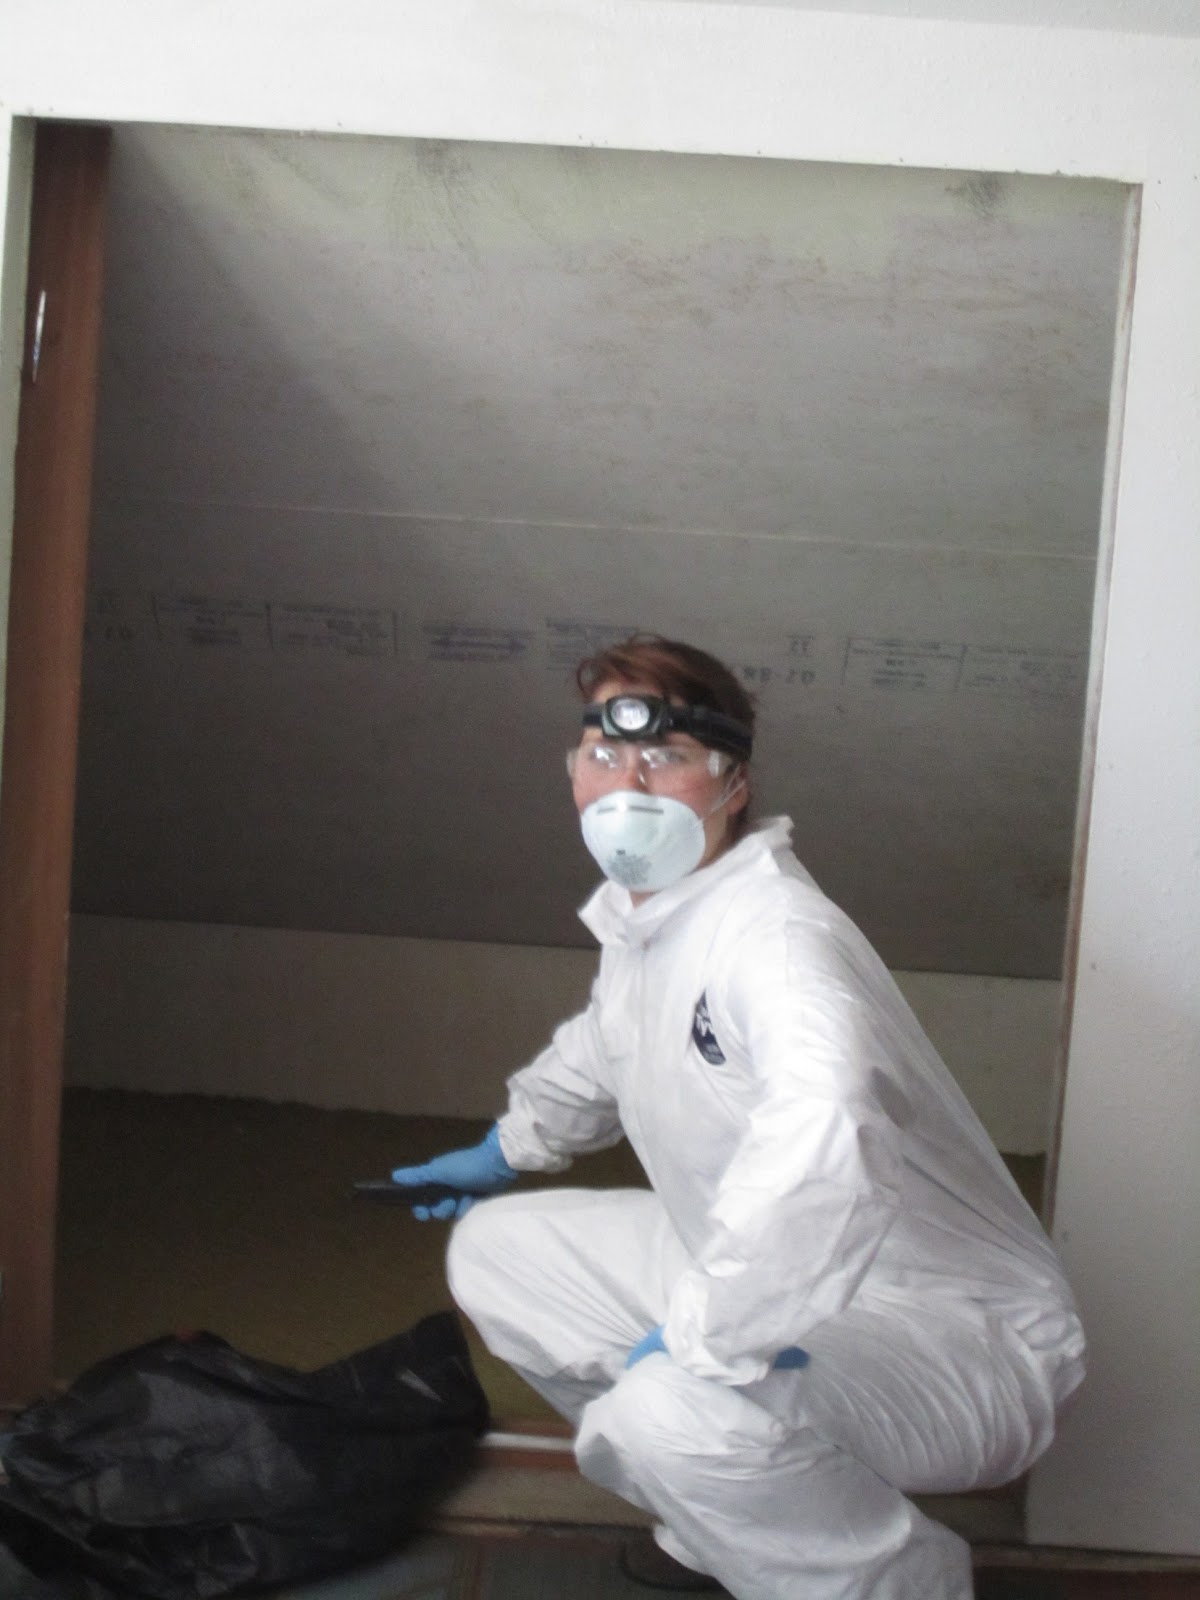
This post should probably be titled 'I am going in!' a la swat team movie. In our master bedroom we have access to both of the eaves space in the house.  By access I mean, on one side of the room we don't have a wall separating us from it.  On the other side of the room we have a creepy half broken sliding door.  The sliding door side has shag carpeting.  Gross green, matted old stinky shag carpeting.  Considering the fact that the past owner had a cat, who was not so good at litter boxes, I could only imagine what was back there.  For that reason I waited a year and half to actually enter the space.


By enter, I mean I put on a tyvex suit, safety glasses, gloves and a head lamp.  I honestly had no idea what was back there, there was no light. Best case scenerio it was old and stinky and maybe had some old bugs.  Worst case scenerio, dead body.  The fact that I slept only about 10 feet from this space is actually pretty amazing.  For the record, I did put furniture in front of the opening to protect myself from any real zombie moments.


Josh and I felt we didn't really need access to the eaves on this side of the house.  We had plenty of storage on the one side and we honestly needed the wall space in the bedroom for our furniture.  We bought a 24" x 24" access panel so that if there was ever an emergency we could still get in there but otherwise would never use it.


But back to the removal. Fully suited up I made a great sight!  Josh documented and after a deep breath I crawled in.  Nothing big to report actually, it was hot, and stinky and pretty dusty.  I used an exacto knife to cut the carpet into ribbons and then put them in trash bags.  It was sweaty work in there and my high level of protective clothing was not breathing. After I removed the carpet I shop vac'ed the whole room and then wipe the space down with clorox.  Phew, house demons banished!  The next week we framed in the slider, installed the access hatch and drywalled the remainder up.  Our house got a little less creepy.

Sunday, July 1, 2012

It's Cold Outside... Let's Install Ceiling Fans?

January 2012

After the new year and a quick trip to San Francisco we buckled down to start a new marathon of projects. The first was to install some Christmas gifts from the family.  Josh asked his mother and I asked my parents for ceiling fans as our big gifts for the year.  We currently have four of the ugliest ceiling fans in man kind history.  These were the brass, oak with a insert of reeding, You know the fans I am talking about, they happen to have graced every home in the late 70's early 80's.  The only difference was you replaced yours, we have not.


For the family room we had two reasons to replace it, one it was ugly and not in keeping with the house.  Two, the room was very dark and has no overhead light, we figured this was a good opportunity to add an overhead light to the space.  I looked for weeks for ceiling fans that match the style of our house, finally I stumbled upon the Period Arts Fan Company.  Super cool, super vintage looking fans, that happen to be built right here in Oregon (bonus!).  We selected the School House Fan, in oil rub bronze with dark cherry blades.  


For the upstairs bedroom, we selected a little more modern/inustrial fan.  Since we have low ceilings upstairs we opted not have a light.  We also have pretty good lighting in the bedroom since there are can lights. We had to order a hugger, which allowed us to hang the fan directly to the ceiling and avoid a rod.  I am serious about the lack of head space, it was tight. We decided to stay with the same oil rub bronze and cherry finish upstairs so there was some consistency. 


While Josh and I have hung most of our fixtures to date, we felt a little nervous about the ceiling fans. These were super heavy, and we weren't entirely sure our wiring would even work with the new fans. We decided to call in an electrician for the work.   We also took the opportunity to add some additional lighting to the basement which was so dark it was almost horror story material.  I lucked out and got some used fixtures from a building remodel so we didn't have to buy any just wire them up!


The electrican was there most of the day and I was sure glad we decided to out source this, he and his partner were grunting and groaning installing these fans.  The living room fan proved extra special since there was no junction box. By the end of the day I had two working fans and 9 additional basement lights, yay! The bad news, it was January and about 40 degrees outside so they fans would just have to sit there looking pretty for a few more months. We really have to work on our timing.